CBX.GridMapping
Copyright (c) 2012, Dean Lunz
All rights reserved.
deanlunz@createdbyx.com
http://www.createdbyx.com/
CBX.GridMapping is a in editor tool for unity that assists you in the creation of worlds that are based around a grid.
NOTE: The current version of this tool does not contain a grid or tile mapping/management system. It is a in-editor creation tool only. A future update will include editor & runtime management API's.
*Temporary Homepage: http://www.createdbyx.com/page/CBXGridMapping.aspx
Google+ page: https://plus.google.com/100290581403134799105
Demonstration video: Getting started
Unity Asset Store: Asset store
Unty Forums: Fourm thread
The links to the temporary homepage & Google+ pages are intended to be place holders until I can decide on a company name and logo so I can set up a domain and official homepage for CBX.GridMapping as well as my other projects.
Image tile sets are from Ari Feldman's SpriteLib (Common Public License) and are not included with this package.
http://www.widgetworx.com/widgetworx/portfolio/spritelib.html
Table of Contents
Grid Mapping [ Top ]
Included assets [ Top ]
CBX.GridMapping includes a simple tile set texture and materials found in the 'CBX Game/Textures' & 'CBX Game/Materials' folders respectively.
Creating a map [ Top ]
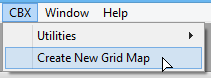
To add a grid map to the scene click "CBX->Create New Grid Map"
Alternatively you can create a new game object and add the 'Grid Map' MonoBehavior found in "CBX Game\Code\CBX.GridMapping\GridMap".
Changing map properties [ Top ]
When the map is selected it will show a series of properties in the inspector window.
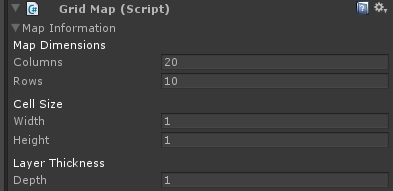
- 'Map Dimensions' - Allows you to specify size of the map in Columns & Rows.
- 'Cell Size' - Allows you to specify the size of each cell.
- 'Layer Thickness' - Defines how far the layers are separated from each other.
Map Layers [ Top ]
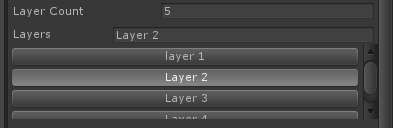
You can set the number of map layers by changing the value of the 'Layer Count' field. There must be a minimum of one layer.
To change the name of a layer click the button for the layer and type a layer name in the 'Layers' field.
Clicking on a layer makes it the active layer and drawing on the map will draw onto the selected layer.
Drawing Helpers [ Top ]

There are four drawing helpers that assist in the creation of maps.
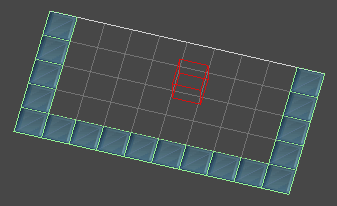
- 'Guidelines' - If checked will draw a line extending from the current marker position. Lines are drawn along the Column, Row, & number of Layers.
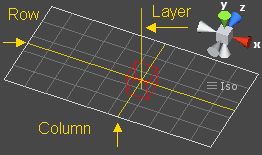
- 'Grid' - If checked will draw a grid for the currently selected layer and show the Column & Rows.
- 'Auto Scale' - If checked prefabs that are drawn will automatically be scaled to fit within the maps 'Cell Size'.
- 'Auto Center' - If checked prefabs that are drawn will automatically be adjusted to perfectly centered within the map cell.
How does 'Auto Scale' work?
When 'Auto Scale' is checked the system only factors in the X & Z size of the prefab when determining how much to scale it. This can lead to issues if the prefab you are drawing is very tall along the Y axis or taller then the maps 'Layer Thickness' value.
How does 'Auto Center' work?
Sometimes a prefab's local pivot point will not be exactly centered to the object. If you are drawing a prefab and that prefab is being drawn with an offset check 'Auto Center' and redraw the prefab.
Auto centering takes into account the bounding box of the objects renderer and the local scale. It then adjusts the position of the prefab so that the center of the map cell and the center of the prefab's bounding box are aligned.
Selecting prefabs [ Top ]
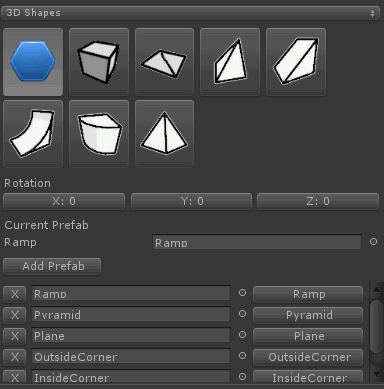
Prefabs are organized into categories. The dropdown menu just above the blue hexagon  contains a list of availible categories and sub categories that you can choose from.
Before you begin drawing you must select a prefab to use.
Selecting the blue hexagon allows you to select a prefab that is not otherwise available in the quick prefab selection grid.
To select a prefab click the prefab selection field under 'Current Prefab' to bring up the asset browser window. Every time you select a prefab in the asset browser a list of recently selected prefabs will appear under the 'Add Prefab' button.
To remove a prefab from the recently selected prefab list click the 'X' button to the left. To select a recently used prefab and use it for drawing click the button to the right to make it the current prefab.
If you want to add additional slots to the recently used prefabs list you can click the 'Add Prefab' button and it will add a new empty entry to the list.
Selecting a material [ Top ]
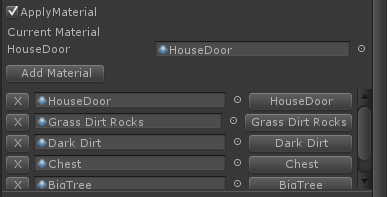
When drawing a prefab from the quick prefab selection list you can also choose a material to be applied to the prefab when it is drawn. The material will only be applied if the 'Apply Material' check box is checked. The 'Current Material' does not get applied to prefabs if you are drawing with the blue hexagon  .
.
To select a material click the material selection field under 'Current Material' to bring up the asset browser window. Every time you select a material in the asset browser a list of recently selected materials will appear under the 'Add Material' button.
To remove a material from the recently selected material list click the 'X' button to the left. To select a recently used material and use it for drawing click the button to the right to make it the current material .
If you want to add additional slots to the recently used material list you can click the 'Add Material' button and it will add a new empty entry to the list.
Changing rotation [ Top ]

If the prefab you are drawing is not oriented properly you can click one of the rotation buttons. The three buttons correspond to the X, Y, Z rotation.
When you click a rotation button a grid of preset rotation values will appear.

Click a rotation value from the grid to set the rotation. To cancel selection and close the selection grid you can click the center square or you can click the rotation button again.
Rotation grids are color coded to match the color of unity's axis. Red for the X axis, green for the Y axis, and blue for the Z axis.
Customizing the prefab list [ Top ]

You can customize the quick prefab selection grid by placing specially formatted *.txt files in the 'CBX Game/Editor/Resources/CBX.Unity/GridMappingPrefabIndexFiles' folder. The *.txt files can have any filename but they must reside in the 'CBX Game/Editor/Resources/CBX.Unity/GridMappingPrefabIndexFiles' folder for CBX.GridMapping to find them. Read more about Resource folders in the Unity documentation here.
// Source asset, texture icon, name

// separator ,
CBX.Unity/Prefabs/Plane, CBX.Unity/Textures/2D 2 Poly Plane, Plane
CBX.Unity/Prefabs/CornerRamp, CBX.Unity/Textures/CornerRamp, CornerRamp
CBX.Unity/Prefabs/Ramp, CBX.Unity/Textures/Ramp, Ramp
Each line defines a new entry.
<PrefabResource>, <TetureResource>, <Name>
- <PrefabResource>
A resources folder path to a prefab asset without the file extension.
- <TextureResource>
A resources folder path to a texture asset without the file extension. This is optional and if not included CBX.GridMapping will use AssetPreview.GetAssetPreview as the texture. Be aware that not all prefabs will have a texture if AssetPreview.GetAssetPreview is used.
- <Name>
Defines the name that the prefab will have when drawing. This is optional but it is recommended that you include a user friendly name so users can identify the type of prefab it is at a glance. If no name is specified the name will be set to the file name of the <PrefabResource> file.
Lines that begin with // are treated as comments and ignored but there are two exception to this rule.
How to define separators [ Top ]
Separators are lines that start with '// separator'. Lines that start with '// separator' are used to define how subsequent entries are parsed. Take the following example ...
// separator ,
CBX.Unity/Prefabs/Plane, CBX.Unity/Textures/2D 2 Poly Plane, Plane
CBX.Unity/Prefabs/CornerRamp, CBX.Unity/Textures/CornerRamp, CornerRamp
// separator $
CBX.Unity/Prefabs/Ramp $ CBX.Unity/Textures/Ramp $ Ramp
CBX.Unity/Prefabs/InsideCorner $ CBX.Unity/Textures/InsideCorner $ InsideCorner
// separator ***
CBX.Unity/Prefabs/OutsideCorner *** CBX.Unity/Textures/OutsideCorner *** OutsideCorner
CBX.Unity/Prefabs/Pyramid *** CBX.Unity/Textures/Pyramid *** Pyramid
In the above example '// separator ,' defines that subsequent lines should be processed using a comma ',' character to separate the prefab, texture and name values. The two following entries Plane and CornerRamp get processed using a comma ',' as the separator.
Then '// separator $' is used to change the separator character from a comma ',' to a dollar sign '$' and the entries for Ramp and InsideCorner are processed using the dollar sign as a separator.
'// separator ***' Is then defined and used as the separator for OutsideCorner and Pyramid entries.
The true purpose of the '// separator' line is to accommodate any possible prefab name by allowing the user to define what separator string will be used to process entries. The default separator character is a single empty space ' '.
How to define categories [ Top ]
Categories are lines that start with "// category". Lines that start with '// category' are used to define what category subsequent entries belong to. Take the following example ...
// Source asset, texture icon, name

// separator ,
// category Category A
CBX.Unity/Prefabs/Plane, CBX.Unity/Textures/2D 2 Poly Plane, Plane
CBX.Unity/Prefabs/CornerRamp, CBX.Unity/Textures/CornerRamp, CornerRamp
// category Category B
CBX.Unity/Prefabs/Ramp, CBX.Unity/Textures/Ramp, Ramp
CBX.Unity/Prefabs/Pyramid, CBX.Unity/Textures/Pyramid, Pyramid
// category Category C/Sub Category of C
CBX.Unity/Prefabs/InsideCorner, CBX.Unity/Textures/InsideCorner, InsideCorner
CBX.Unity/Prefabs/OutsideCorner, CBX.Unity/Textures/OutsideCorner, OutsideCorner
- 'Plane' & 'CornerRamp' will be included in category 'Category A'.
- 'Ramp' & 'Pyramid' will be included in category 'Category B'.
'InsideCorner' & 'OutsideCorner' will be included in a sub category 'Category C/Sub Category of C'.
You can define sub categories by including a '/' character in the category name. Note that at least one category must be defined at the top of the file otherwise no prefabs will be assed to the quick prefab selection grid.
How to draw prefabs [ Top ]
Drawing prefabs is as simple as selecting the map in the hierarchy and using the left mouse button to draw the current prefab. Drag the left mouse button to continuously draw prefabs. Use the right mouse button to erase prefabs.
Depending on what settings are checked you may need to hold one or more of the Shift, Alt & Control buttons while drawing or erasing.
Understanding the naming convention [ Top ]
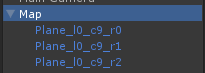
Prefabs that are drawn are added as children under the map. Each part of the name is separated by an underscore '_'. The name of the prefab is structured as follows...
- Prefab name.
- Underscore separator.
- 'l' character indicating the layer followed by a number indicating what layer the prefab belongs to.
- Underscore separator.
- 'c' character indicating the column followed by a number indicating what column the prefab belongs to.
- Underscore separator.
- 'r' character indicating the row followed by a number indicating what row the prefab belongs to.
The purpose of this naming convention is to allow for easy identification of children under the map object. With this structured naming convention 3rd party tools can be written to make sense of the prefabs that make up the map.
Settings [ Top ]

CBX.GridMapping allows you to change various settings that controls how it looks and operates. To change the settings click "Edit->Preferences" from the unity menu and select "cbxTools" from the left column of setting categories.
CBX.GridMapping integrates with a common settings section called "cbxTools". The 'Settings File' field defines the location of a *.xml settings file where CBX.GridMapping will store all of it's settings. Click the '...' button to use a save file dialog and specify the location where you want the settings file to be saved.
By default if you have not yet specified a file CBX.GridMapper will store settings in your 'My Documents' folder with the file name 'cbxToolSettings.xml'. CBX.GridMapping stores settings in a xml file because it allows you to copy the settings to other computers that have unity and the CBX.GridMapping tools. Or for example after a OS reinstall you can point to the xml settings file and all your saved settings will be restored.
General Settings [ Top ]
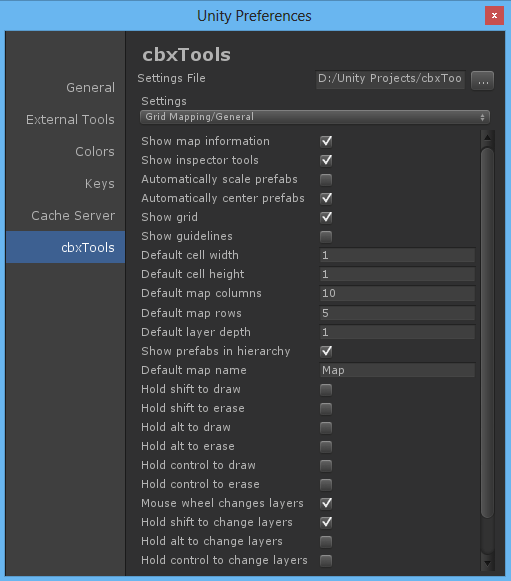
- Show map information - If checked the 'Map Information' foldout will be open by default when creating a new map.
- Show inspector tools - If checked tools will be shown in the inspector. Only the 'Map Information' foldout will be visible in the inspector.
- Automatically scale prefabs - If checked the default setting for 'Auto Scale' will be checked when a map object is selected.
- Automatically center prefabs - If checked the default setting for 'Auto Center' will be checked when a map object is selected.
- Show grid - If checked the default setting for 'Grid' will be checked when a map object is selected.
- Show guidelines - If checked the default setting for 'Guidelines' will be checked when a map object is selected.
- Default cell width - When a new map is created it's cell width will be set to this value.
- Default cell height - When a new map is created it's cell height will be set to this value.
- Default map columns - When a new map is created it's column count will be set to this value.
- Default map rows - When a new map is created it's row count will be set to this value.
- Default layer depth - When a new map is created it's layer depth will be set to this value.
- Show prefabs in hierarchy - If checked prefabs that are drawn will be visible as children under the map and visible in the hierarchy. If you do not wish to see drawn prefabs in the hierarchy uncheck this. You can search for hidden game objects in the scene using the Hidden Game Objects window.
- Default map name - This will be the name given to newly created maps.
- Hold shift to draw - Requires the user to hold the shift key in order to draw prefabs.
- Hold shift to erase - Requires the user to hold the shift key in order to erase prefabs.
- Hold alt to draw - Requires the user to hold the alt key in order to draw prefabs.
- Hold alt to erase - Requires the user to hold the alt key in order to erase prefabs.
- Hold control to draw - Requires the user to hold the control key in order to draw prefabs.
- Hold control to erase - Requires the user to hold the control key in order to erase prefabs.
- Mouse wheel changes layers - If checked you can use the mouse wheel to change the active layer.
- Hold shift to change layers - If checked you will need to hold the shift key while scrolling the mouse wheel to change layers.
- Hold alt to change layers - If checked you will need to hold the alt key while scrolling the mouse wheel to change layers.
- Hold control to change layers - If checked you will need to hold the control key while scrolling the mouse wheel to change layers.
Color Settings [ Top ]
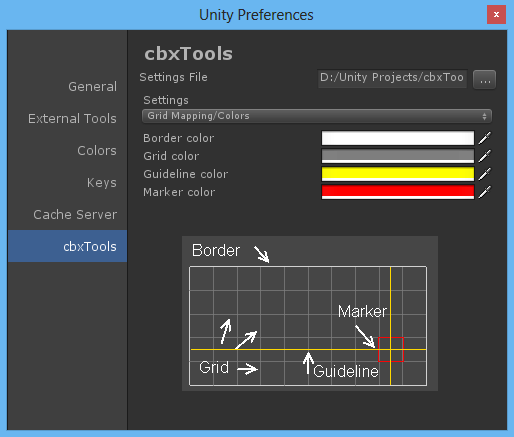
- Border color - Sets the color of the map border.
- Grid color - Sets the color of the map grid.
- Guideline color - Sets the color of the map guideline.
- Marker color - Sets the color of the map marker.
Prefabs [ Top ]
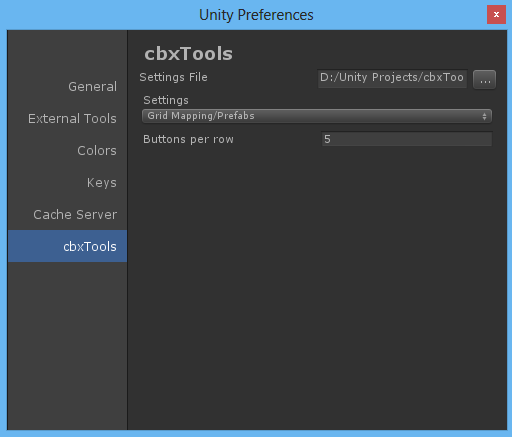
- Buttons per row - Is used to specify how many buttons per row the quick prefab selection grid will have.
Recent Materials [ Top ]
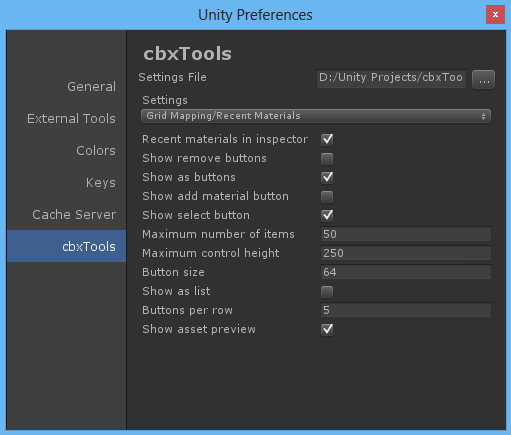
- Recent materials in inspector - If checked the recent materials list will be visible in the inspector.
- Show remove buttons - If checked the remove buttons will be visible in the recent materials list. Remove buttons will only be visible if 'Show as list' is also checked.
- Show as buttons - If checked each material in the recent material list will be shown as a button rather then a object selection field.
- Show add material button - If checked the 'Add Material' button will be visible above the recent materials list.
- Show select button - If checked will show a 'Select' button to the right of items in the recent material list. The select button is only available if 'Show as list' is checked and 'Show as buttons' is unchecked.
- Maximum number of items - Restricts the number of items that can be in the recent material list by the specified value.
- Maximum control height - Restricts and sets the height of the recent material list to this value.
- Button size - Specifies the size of the buttons. if 'Show as list' & 'Show as buttons' are checked the height of the buttons in the list will be set to this value.
- Show as list - If checked the recent materials will be shown as a regular list. If unchecked the recent materials will be shown as a grid of buttons.
- Buttons pre row - Restricts the number of buttons per row that is displayed when 'Show as list' is unchecked.
- Show asset preview - If checked items in the recent materials list will use the same image representation as they appear in the asset selection window. Otherwise the predefined texture will be used. See Customizing the prefab list about how to associate a texture with a prefab.
Recent Prefabs [ Top ]
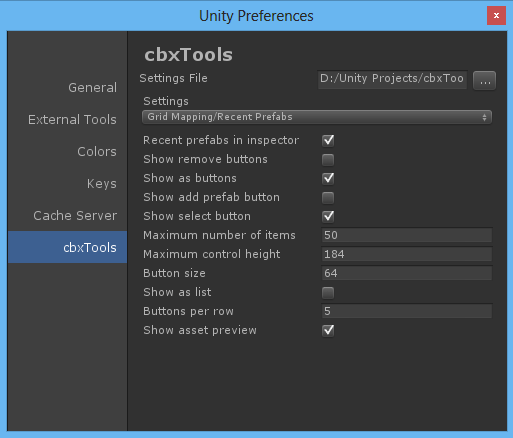
- Recent prefabs in inspector - If checked the recent prefabs list will be visible in the inspector.
- Show remove buttons - If checked the remove buttons will be visible in the recent prefabs list. Remove buttons will only be visible if 'Show as list' is also checked.
- Show as buttons - If checked each prefab in the recent prefab list will be shown as a button rather then a object selection field.
- Show add material button - If checked the 'Add Prefab' button will be visible above the recent prefabs list.
- Show select button - If checked will show a 'Select' button to the right of items in the recent prefab list. The select button is only available if 'Show as list' is checked and 'Show as buttons' is unchecked.
- Maximum number of items - Restricts the number of items that can be in the recent prefab list by the specified value.
- Maximum control height - Restricts and sets the height of the recent prefab list to this value.
- Button size - Specifies the size of the buttons. if 'Show as list' & 'Show as buttons' are checked the height of the buttons in the list will be set to this value.
- Show as list - If checked the recent prefabs will be shown as a regular list. If unchecked the recent prefabs will be shown as a grid of buttons.
- Buttons pre row - Restricts the number of buttons per row that is displayed when 'Show as list' is unchecked.
- Show asset preview - If checked items in the recent prefabs list will use the same image representation as they appear in the asset selection window. Otherwise the predefined texture will be used. See Customizing the prefab list about how to associate a texture with a prefab.
Bug Reporting [ Top ]
If you find a bug or undesired behavior you can send an email to deanlunz@createdbyx.com with a description of your issue and I will respond as soon as I can.
At the time of this writing CBX.GridMapping does not have an "official" website and does not include a system for automatically detecting hard crashes and submitting a bug report. This is a feature that will be implemented in a future release.
Conditional Compilation Symbols [ Top ]

CBX.GridMapping requires two conditional compilation symbols to be present in order for it to work properly. These 2 symbols "CBXControls" & "GridMapping" should automatically be added for the WebPlayer and Standalone build settings when you first install the CBX.GridMapping package.
The "CBX Game\Code\Editor\GridMapping\GridMappingSetup.cs" file is responsible for automatically registering these symbols.
You may see a warning stating "No localization file found for 'en-US'" upon importing the CBX.GridMapping package. This has to do with the order of operations that unity takes when importing and running scripts and should not affect the operation of CBX.GridMapping.
Known Issues [ Top ]
- Clicking the rotation buttons to show the preset rotations can lead to the rotations grid not fully displayed requiring the user to scroll down the inspector window to fully see it. This will be addressed in a future workflow update.
- 'Button size' under the recent materials & recent prefabs settings window affects the 'Select' button when 'Show as list' is checked & 'Show as buttons' is unchecked. It's not a bug but it is a minor nuisance. Will probably be tweaked in a later update. This is because the 'Select' button and the 'Show as buttons' setting internally resuse the same button control.
- When the map is rotated and user draws prefabs the prefabs are placed where they should be but positioning the mouse over a grid cell on a map that is rotated is not exact and precise like it is when the map has no rotation. This gets exacerbated when the active layer is beyond 3 layers deep. It works but it is not as accurate as I would like it to be.
Concerns [ Top ]
- My main concern at this point is the layering system as it exists now. It becomes far to cumbersome to create 3D maps that contain more then 3 layers even with mouse wheel scrolling to change the active layer. A solution I am thinking of is similar to how blocks are drawn and erased in the game Minecraft. The CBX.GridMapping system would essentially determine where you are trying to draw and based on that will automatically set the active drawing layer.
Keep in mind that CBX.GridMapping was never intended to be a Minecraft world creator or clone but a quick and easy means of drawing prefabs onto a grid plane.
- I am hesitant to provide a API fo CBX.GridMapping at the moment because I have a tendency to heavily refactor sections of code if I feel they are not clean, straight forward, or simple enough. I use visual studio 2012 with various extensions to assist in refactoring my code making it very easy to do so.
I am unaware of how easy or hard it is to refactor large pieces of code in Mono Develop. This can lead to serious issues when it comes to providing a API that developers will be building tools for. So knowing this I may decide to implement an official API later in the development cycle then some people may like. In the mean time CBX.GridMapping names prefabs using a structured naming convention so it's easy to understand where prefabs are located on the map if people decide to write tools that work with CBX.GridMapping.
Maintaining consistency [ Top ]
I am a strong believer in maintaining the look and functionality of software even when adding more features. When websites like Youtube, Netflix, as well as almost all software programs update there user interface or add new features, they often do not allow the user to revert back to the old style or feature set.
That is why I have provided a number of settings that can be changed to allow the user to incorporate the new features or hide undesired features that the user may not have need for.
Version Notes [ Top ]
Items starting with "Completed" are items that have been fully implemented as they were intended
Items starting with "Partial" are items that have only been partially implemented.
v1.2
- Completed - CBXEditorHelpers.toolBarButtonSize need to be replaced with a setting in xml file
- Completed - Need ability to specify in settings weather user need to hold alt ctrl or shift to draw and erase
- Completed - For included prefabs you should have mesh generation ones as well as actual prefab *.fbx ones so the user does not wish to take advantage of mesh generation they can have option to use mesh based prefabs.
- Completed - Should use multiple prefab list files so they can be bundled together and included with prefabs for distribution as a *.unitypackage
- Completed - Recently used prefab list and recently used materials list should not show the name but rather just 'Select'
- Completed - Recently used prefabs and material lists need a setting to say weather or not to show the object selection field or weather to just show a button.
- Completed - Settings for setting the max number of items that a recently used lists can contain.
- Completed - Need to localize all strings for grid mapping using a localization system
- Completed - Have settings to specify the max height of the list of recent materials or prefabs
- Completed - Categorized quick prefab selection
- Completed - Additional prefab shapes for 2D and 3D
- Partial - Ability to edit along different axis. Currently it only supports X/Z axis editing with layers extending into the Y plane. Partial support by granting the ability to rotate the map object and still draw
- Completed - Have option to show recent material & prefab lists displayed as grid of buttons
- Completed - GridMapping DrawMapInfo method uses a cloned skin from a label and makes it white for highlighting sections. You should not do this because it could cause issues if the skin is different.
- Completed - Auto scale does not take into account rotation while drawing so a tall obj drawn with no rotation works fine but a tall object draw with 90 rotation along x causes it not to scale properly IE it does not fit within the cell dimensions. This has been fixed
- Partial - When the map is rotated and user draws the prefabs are not rotated with the map and as such are not drawn in there proper location. This was partially fixed. Prefabs are placed where they should be but positioning the mouse over a grid cell on a map that is rotated is not exact and precice like it is when the map has no rotation. This gets exaderated when the active layer is beyond 3 layers deep. It works but it is not as acurate as I would like it to be.
- Completed - Full setting customizability for changing grid & guideline colors etc
- Completed - Tile material creation window needs setting in settings dialog for 'As list' check box as well as default output path etc
- Completed - Tile material createion should have ability to flip along horiz and vert
v1.0 - v1.1
Future list of features [ Top ]
For the purposes of transparency here are a list of features that may or may not be coming in subsequent updates listed in no particular order.
For an up to date list visit the homepage links provided here.
- Grid mapping could have a viewport like selecting a camera that allows clicking to move the view to a position on the map. Think starcraft mini map click to see that part of map
- CBX.GridMapping need feature to highlight grid cell prefabs that are completely surrounded by other prefabs. and the option to optimize the map by removing them etc
- need Flood fill, draw rectangle type tools for Grid mapping
- ability to show all layers where each layer had a grid drawn for it
- ability to hide and show individual layers
- ability to change a layer thickness or offset for each individual layer
- ability to prevent the guideline from drawing a layer guideline
- ability to quickly snap rotate the view when editing so u can change your perspective make this a quick tools feature separate from grid mapping find the point on the layer where the view is focused on and rotate around that point snap rotations around 45 degrees but have setting so users can change the 45 degrees
- need ability to specify if specific parts for grid mapping are visible in the inspector like the layers or just the prefab tools etc.
- need ability to set weather drawing prefabs will be placed mid center like they do now or weather they are placed on top of the layer so the bottom y values are all lined up along the layer depth. also need a setting for this.
- show what row & column number the marker is over in scene view as well as where it's placed in scene view
- settings needs a reset to defaults button to reset settings to there factory defaults
- Need an gui editor for the prefabs list so users don't have to edit by hand
- Ability to select a rect of blocks and move them by dragging them to a different location
- drawing with blue hexagon you should also be able to draw with currently selected material
- Editor & runtime API's for grid mapping
- Prefab creation via select a rectangle of blocks and convert to prefab
- grid mapping Isolation of an area to make a blocks easier to edit
- Drawing rules so that surrounding prefabs will be automatically updated
- come up with a way of organizing materials and selecting them other then having to use unity asset selection window. selecting assets with unity is too slow
- tile material creation needs ability to create rotated materials
- grid mapping should not have ability to auto size based on weather the user draws outside of the grid.
- grid mapping should have eye dropper feature where you can hold a combo of alt ctrl shift etc and click a tile to use it's material as the current material
- when a recompile occurs in unity recent material and prefabs are lost use object finalize cleanup to store the list and retrieve it later
- grid mapping needs feature to be able to auto scale any existing prefabs drawn on the map like when user changes cell size or ability to auto scale the selected prefabs
- when using the mouse wheel to scroll the inspector if the scrolling action causes the mouse to be positioned over one of the recently used lists or the list of layers inspector scrolling stops. This is an undesired effect. Unfortunately I'm not sure how to address this at the moment.
- grid mapping layers need same treatment as recent used lists
- clicking button in recent prefab or material lists should move that button to front of list keeping most commonly used items near the top
- minecraft style drawing where user is able to draw on different layers automatically without having to explicitly set the active layer they are wish to work on
- gridmapping needs a clone layer feature
- need setting to determine if all actions requires the mouse to be positioned over the active layer or not ala "if (this.IsMouseOnLayer())".
- need setting to determine if drawn prefabs should have there name included at beginning of the format string "_l{0}_c{1}_r{2}" or rather have user specify the format string them selves
- consider adding preset area in the settings to allow auto setting all the settings to preset values by reading a setting file or something. Also have feature to reset settings to there default values
- need ability to paint onto a layer and have the existing prefabs move vertically up and down to make prefabs different heights along the layer
- Tile materials creation windows needs ability to ask when overriding if user wants to replace materials in scene with the material that is to be overwritten otherwise material links will be broken
- setting that allows the user so specify how the mouse wheel direction will affect changing the active layer
- have setting to hide show the foldout control for hiding map information
- ability to lock a layer so it can not be drawn or erased
- utility for adding and removing spacing from a tile set as well as changing the spacing and able to specify the spacing color
- ability to change settings for marker size offset, or weather it's filled or wireframe or shows preview of the current prefab to be drawn
- left or right mouse buttons can be mapped to either draw or erase and each button can be used to draw a different prefab
- Tile material creation window need x/y offset value allowing for selecting tile that are perfectly aligned with the 0,0 origin of the texture
- find a way to convert the current html based documentation to pdf format so that the images used for documentation do not appear in the texture selection asset browser window
- Tile material creation needs a color field so the material color can be specified
- Tile material creation needs ability to edit an existing material or edit the selected material etc
Related features not CBX.GridMapping specific
- Create an error reporting tool for your code for auto submission to a website etc.
- Image to mesh tool converts pixel art into a mesh and use vertex colors
- Prefab creation via select a rectangle of blocks and convert to prefab
- need to make comedy videos of attempts to create a specific tile map using unitile, tidy, 2d tile and cbx.gridmapper to compare workflow and speed then post results on the you tubes.